

Custom Mobile Food Trailer: How to Design a Standout Kitchen on Wheels
2026-11-16
What separates a food trailer that draws a crowd from one that gets lost in the lineup? It’s rarely the menu alone—it’s the design. A custom mobile food trailer turns your kitchen into a moving billboard, a space that works with your flow and lingers in customers’ minds. At Oriental Shimao, we know that standout builds start long before the first service, with choices most builders overlook. Here’s how to design a kitchen on wheels that refuses to be ordinary.
Draft a Layout That Keeps Cooks Moving Forward, Not Sideways
A well-planned kitchen doesn't just look good on paper; it respects the natural sequence of cooking. Start by placing dry storage and refrigeration near the entry, then set up a prep zone with a clear landing area for cutting boards and mixing bowls. The range or cooktop sits directly ahead of that prep space, and a narrow plating shelf or counter is positioned just beyond the heat source. This prevents the cook from turning around or stepping sideways to grab a pan, season a dish, or plate a finished plate.
The real test comes when two or three dishes are in motion. If the sink is off to the side or the trash pull-out sits behind the cook, every rinse and scrape forces a lateral shuffle. Instead, run a short, straight path from sink to prep to stove, with the trash bin under the main prep counter. It sounds simple, but many kitchens fail because the architect drew a pretty triangle rather than a working line. Keep that line unbroken and you'll notice the difference the first time you cook a full meal.
Pick Finishes That Can Take a Grease Fire and a Pothole Without Flinching
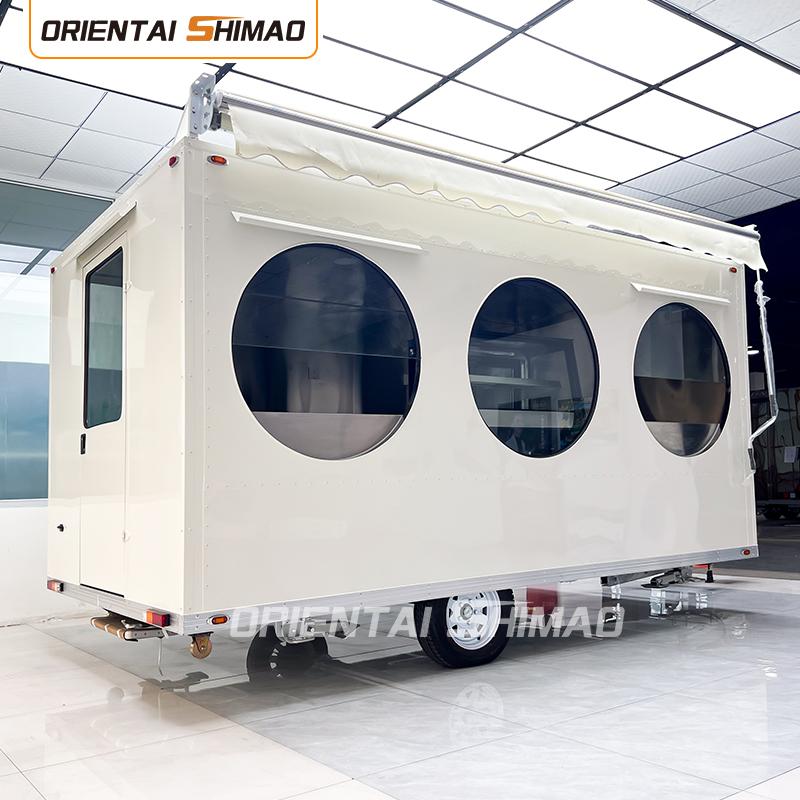
Kitchen cabinets live a hard life, especially when the stove sits close by and the road outside is more gravel patch than smooth asphalt. You want a finish that shrugs off spitting oil from a cast-iron skillet and doesn't buckle when the delivery truck rattles past and sends a jar of sauce tumbling into the door front. Look for two-part polyurethane or conversion varnish—these cure into a hard, heat-resistant shell that laughs at grease splatter and shrugs off minor impacts. Stay away from thin lacquers or raw wax finishes; they might look lovely in a showroom, but a real kitchen with real cooking will leave them scarred within a month.
The other side of the coin is how the finish handles humidity and temperature swings. A kitchen that bakes a pie in July and freezes solid in January can make cheaper finishes crack along the edges like a dry riverbed. A quality catalyzed finish flexes just enough to move with the wood while still blocking moisture. Test a sample panel before committing: rub it with hot bacon grease, drop a heavy spoon on it from counter height, and leave it in a steamy bathroom for a weekend. If it still looks clean and flat, you've found your keeper.
Color choice also plays a part. Dark stains and opaque paints will show every scratch and oil smear, no matter how tough the topcoat. A mid-tone or slightly distressed finish hides the daily chaos without looking like a rental unit. And remember that matte finishes tend to wear faster at high-touch corners, so ask for a satin or semi-gloss on doors and drawer fronts. That little bit of sheen adds an extra layer of protection—and makes wipe-downs a lot less of a chore.
Steal Storage Ideas From Sailboats and Tiny Homes, Not Office Cabinets
Sailboats and tiny homes don't waste a cubic inch because they can't afford to. Instead of defaulting to a standard office cabinet with fixed shelves and wasted vertical space, look at how a galley uses magnetic knife strips on the wall, tension rods inside lockers, and narrow pull-out pantries that fit between studs. Translating this to a workspace means mounting pegboard on the inside of cabinet doors, adding slim rolling carts that slip under a desk, and using stackable clear bins labeled on the side rather than from above.
The most useful trick is treating storage as layers, not just boxes. A tiny home might hide a fold-down table in a stair riser or store off-season gear beneath a floor hatch. In an everyday room, that could mean using the dead space under a window seat for drawers, or turning a blank wall into floor-to-ceiling shelving with a library ladder. Office cabinets tend to create one big cavity that ends up half empty at the top and impossible to reach at the bottom. Sailboat-style storage breaks that cavity into shallow, visible zones so nothing disappears behind something else.
Finally, steal the principle of "a place for everything, and everything lashed down." On a boat, items aren't just stored; they're secured. In a workspace, that translates to drawer dividers, labeled pouches, and small bins that stop loose supplies from drifting. The goal isn't more furniture—it's fewer, smarter containers that respect how you actually move through the room.
Make the Outer Shell a Roaming Billboard That Feels Hand-Built
Forget the vinyl wraps that peel at the edges and the digital screens that turn every street into a pixelated blur. The outer shell should carry its message the way a weathered hand-painted sign outside a family-run motel does—slightly uneven, deeply personal, and impossible to ignore. Instead of a uniform gloss, we let the surface hold the memory of its making: brushstrokes that wander just a little, color that pools thicker in one corner, a texture that asks to be touched. The billboard doesn't roll down the road; it ambles, like a cart with a story nailed to its side.
This isn't about slapping a logo on a moving box. It's about turning the exterior into a slow, physical conversation. Maybe the paint is mixed with sand from the beach where the vehicle first ran, or the lettering is done freehand after a few cups of coffee, so the O's come out slightly lopsided. Those imperfections become the brand. Passersby don't just see an ad—they see evidence that someone stood there, huffed, adjusted their grip, and said, "Good enough, but let me fix that one curve." The result feels less like marketing and more like a note left on a windshield.
Durability matters, but not in the way of factory coatings. A hand-built shell should wear its scuffs like a journeyman's tool belt. Each chip in the paint from a gravel road, each fade from a southern sun, adds another layer to the message. You're not trying to keep the billboard pristine; you're trying to let it age into truth. When the truck finally parks for good, the shell should look like a journal cover—creased, stained, and full of places it's been. That's the roaming billboard that doesn't shout but lingers.
Treat Water, Gas, and Electric Lines Like a Backstage Crew, Not an Afterthought
Most renovation plans treat water, gas, and electric lines like stagehands who only get called when something breaks. The result is a house full of awkward soffits, surface-mounted pipes, and access panels that never quite close. Instead, give these systems the same early attention you'd give a lighting plot: walk the space before framing, mark every outlet and shutoff, and settle conflicts while the walls are still open.
A backstage crew succeeds because every move is rehearsed before the curtain rises. Your utility lines need that same choreography. Tape out runs on the floor, check clearances for a gas pipe behind a range, and make sure a toilet drain doesn't collide with a floor joist. These decisions take an afternoon, but they prevent a week of demolition later.
The reward is a house that ages gracefully. When lines are routed with intent, a future repair doesn't mean tearing out tile, and adding a circuit doesn't turn into a drywall puzzle. It's invisible work, much like resetting props in the dark — but it's what keeps the whole production from grinding to a halt.
Pass Your First Inspection by Building Code Into the Design Early
Treating code compliance as an afterthought is the fastest way to stall a project. When structural, electrical, and accessibility requirements are woven into the schematic phase, inspectors see a project that was born meeting the rules—not one that had to be retrofitted to satisfy them. Early collaboration between architects and code consultants turns potential red flags into ordinary design decisions, such as stair geometry, corridor widths, and egress paths, before they become expensive change orders.
A practical approach is to run a preliminary code review at the same time as the first massing studies. This means checking allowable building area, height, and occupancy load side by side with the client’s program. If a proposed use would trigger a fire sprinkler upgrade or an additional exit stair, the team can adjust the layout on paper rather than tearing out drywall later. Keeping a living checklist of jurisdiction-specific amendments also helps, because local interpretations often diverge from the model code in ways that only surface during plan review.
When the first inspection arrives, the goal is for the plans to speak the same language as the inspector’s checklist. That happens only if code references are called out in the drawings, from door swing directions to handrail extensions. By documenting those details at the design development stage, you avoid the common trap of a perfectly beautiful building that fails because nobody measured the landing at the bottom of a stair until it was already poured.
FAQ
Start with your menu and daily volume, not the trailer itself. Every piece of equipment, the water tank size, the generator output, even the counter height depends on what you're actually cooking and how many covers you plan to serve in a rush. Nail down the workflow first, then let the trailer shape itself around it.
Think in zones: prep, cooking, plating, and hand-off. A common mistake is cramming too much into a straight-line layout. If your menu has multiple stations, an L-shaped or U-shaped setup cuts down on cross-traffic and lets two people work without bumping elbows. Keep the pass-through window close to the plating area so food doesn't travel far.
Stainless steel for all food-contact surfaces, no question. For walls, use FRP panels or aluminum composite — they clean fast and don't soak up grease. Flooring should be non-slip vinyl or aluminum diamond plate with a slight slope toward the drain. Skip wood anywhere near moisture or heat unless it's sealed and used as trim only.
It depends on your local codes, but many jurisdictions still require a Type 1 hood for any grease-producing cooking, even electric griddles or fryers. If you only run a coffee setup or cold prep, you might get away with a Type 2 hood or just ventilation. Check with your health department before buying anything.
Add up your equipment's running watts, then add 20-25% for startup surges and future tweaks. A full kitchen with a fryer, fridge, and AC often needs 12,000 to 18,000 watts. A quieter inverter generator is worth the extra cost if you park anywhere near residential areas or events with noise limits.
Don't rely on a busy wrap alone. Use one bold color or texture on the lower half, keep the serving side clean, and light the menu board like a storefront. A fold-down exterior shelf with a few bar stools creates an instant gathering spot, and a custom overhead awning does more for curb appeal than any generic decal pack.
You'll need a fresh water tank, a grey water tank, and usually a separate waste tank for sinks. Size them based on your busiest day, not the average. A 50-gallon fresh tank might cover 4-6 hours of moderate service, but dishwashing eats through it fast. Install a water pump with a pressure tank so water flow stays steady when two faucets run at once.
A bare-bones trailer starts around $25,000-$35,000, but a fully outfitted kitchen with custom fabrication, good equipment, and a generator often lands between $60,000 and $120,000. The frame and shell are cheap; the equipment, plumbing, electrical, and finish work are where money disappears. Get three quotes for fabrication and always leave a 15% contingency.
Conclusion
A well-designed mobile food trailer starts with a floor plan that respects the cramped reality of cooking on wheels. Instead of wedging in equipment wherever it fits, draw a straight path from prep to pass-through window so a cook never has to pivot or sidestep mid-service. Surfaces get hit with hot oil, dropped lids, and road vibration, so choose stainless steel, sealed wood, or commercial-grade laminates that won't peel after a few months. Storage should borrow from sailboat galleys and tiny-house lofts: think magnetic knife strips, toe-kick drawers, fold-down shelving, and slim vertical cubbies that hold sheet pans against the wall, not deep cabinets where pans disappear.
The outside of the trailer matters as much as the inside. A hand-painted sign, rusted patina accents, or custom metalwork can make the shell feel like a roaming storefront rather than a generic box. Behind the walls, water, gas, and electric lines need to run like backstage rigging: labeled, accessible through removable panels, and routed away from heat and moisture. Most first-time builders overlook code requirements until the inspector shows up, so reverse that by reading local health and fire rules before cutting the first hole. If the trailer is designed to meet code from day one—proper clearances, venting, and shutoff valves—the final inspection becomes a formality instead of a scramble.
Contact Us
Contact Person: Jack Wang
Email: [email protected]
Tel/WhatsApp: 8618306483516
Website: https://www.orientalshimaofoodtruck.com